E16 | Grass Seed Facility, Porch Swing | Ask This Old House
Season 24 Episode 16 | 23m 42sVideo has Closed Captions
How turf grass seed is harvested and cleaned; how to install a porch swing.
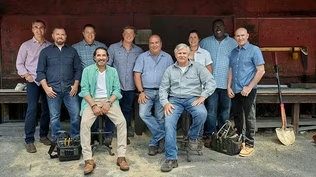
Lee Gilliam heads to Washington state to uncover why the Pacific Northwest is the heart of Kentucky bluegrass seed production; experts in the industry give him a tour of a seed cleaning facility. Then, Mark McCullough breaks down popular paver types and walkway patterns. After, Nathan Gilbert teams up with a homeownerand a helpful young sidekick install a porch swing.
Problems playing video? | Closed Captioning Feedback
Problems playing video? | Closed Captioning Feedback
Funding for Ask This Old House is provided by The Home Depot, Renewal By Andersen, and ChipDrop.
Support provided by:


E16 | Grass Seed Facility, Porch Swing | Ask This Old House
Season 24 Episode 16 | 23m 42sVideo has Closed Captions
Lee Gilliam heads to Washington state to uncover why the Pacific Northwest is the heart of Kentucky bluegrass seed production; experts in the industry give him a tour of a seed cleaning facility. Then, Mark McCullough breaks down popular paver types and walkway patterns. After, Nathan Gilbert teams up with a homeownerand a helpful young sidekick install a porch swing.
Problems playing video? | Closed Captioning Feedback
How to Watch Ask This Old House
Ask This Old House is available to stream on pbs.org and the free PBS App, available on iPhone, Apple TV, Android TV, Android smartphones, Amazon Fire TV, Amazon Fire Tablet, Roku, Samsung Smart TV, and Vizio.
Keep Exploring


This Old House Insider Newsletter
Get This Old House exclusive stories, tips, and behind-the-scenes information delivered right to your inbox every month.Providing Support for PBS.org
Learn Moreabout PBS online sponsorship♪♪ Kevin: On "Ask This Old House," our experts travel across the country to answer questions about your house.
♪♪ Today, Lee heads to the Pacific Northwest to learn about grass-seed manufacturing.
Lee: So it's almost like panning for gold back in the day.
Kevin: Then Mark gives a primer on pavers, the various materials available and how to arrange them.
And Nathan gets some help from an apprentice installing a porch swing.
Nathan: Thank you.
[ Cheering ] Kevin: On "Ask This Old House."
Lee: Do you ever wonder where your grass seed comes from?
I'm out here in the Pacific Northwest.
It's beautiful out here.
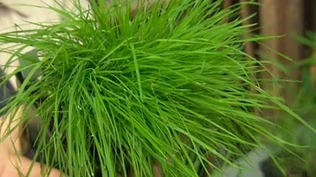
And we're looking at Kentucky bluegrass.
It's a beautiful seed.
We have it out here in the fields, growing like this all the way to harvesting to a plant that shakes it all down and cleans it all up.
So let's go and take a look.
♪♪ Hello.
Hi, Michael.
How are you?
I'm Lee.
Michael: Lee, Michael Neff.
Nice to meet you.
Lee: Nice to meet you as well.
I'm excited to be out here.
This is gorgeous.
Question -- Why is it the area for beautiful Kentucky bluegrass to grow?
Michael: Well, 80% of the world's Kentucky bluegrass seed is produced.
It's here in eastern Washington.
90% of the world's Kentucky bluegrass seed is produced in the Inland Northwest, which includes northern Idaho and northern Oregon.
Lee: Okay.
And what's your role?
What do you do?
Michael: So, my role is I'm a professor at Washington State University and I'm a grass breeder.
And in the case of Kentucky bluegrass, we talk with the producers and the end users to figure out what it is that they're looking for, and then we develop those varieties and move them into the market.
What we're breeding for right now is yield, salt tolerance, which allows you to irrigate with recycled water, and then drought resistance.
Lee: Okay, great.
What do we have here?
Michael: This is a Kentucky bluegrass flower.
Lee: Okay.
Michael: So these are the seed heads.
There's individual flowers in here.
And inside those flowers is the seed.
So what they'll do when they harvest is that they will cut the grass at night.
Lee: So why are we doing at night?
Michael: Well, at nighttime, it cools off, and that increases the humidity a little bit.
Just like how fog happens when it gets cooler.
And so that keeps the moisture in the head and it keeps the seeds from being lost during that first cutting.
Lee: Okay.
Michael: Then they'll have these windrows or piles and they'll let that dry for a couple of days.
And then they'll come in with a combine, which is a combined harvester and thresher, and they will separate out these seed heads from the rest of the plant.
Then they will take that, and they'll go to a seed-cleaning plant, where they'll do the rest of the separation out until we get to these little teeny seeds.
Lee: Okay.
Michael: It's over a million seeds per pound.
Lee: Wow.
Is there a plant nearby we can go take a look at?
Michael: There is.
Absolutely.
Lee: Okay.
Michael: It's a very typical seed-cleaning plant here in eastern Washington.
They've invited us to come and see how the whole process works.
Lee: Great.
Let's take advantage of that.
Michael: Let's do that.
Lee: Okay.
Let's go.
Michael: Alright.
Lee: Hey, how are you doing?
I'm Lee.
Jason: Jason Miller.
Nice to meet you.
Lee: Nice to meet you, Jason.
Beautiful facilities.
Oh, my goodness.
Jason: Well, thank you.
A nice day here today.
Lee: It's a gorgeous day here.
Michael: So, Lee, Jason is the owner and operator of this seed-cleaning facility here.
What we're looking at is Kentucky Bluegrass.
It's very similar to the material that was in the field that we were at this morning.
Lee: Then we're going to go clean this?
Michael: Yep.
Lee: Interesting to see how that's done.
Michael: So, Jason, do you mind showing us how the whole cleaning operation works today?
Jason: I will.
Let's go.
Lee: Let's go see that.
Michael: Awesome.
Alright.
Lee: So what do we have here, Jason?
Jason: Lee, we have our feeder that controls this process in this grass-cleaning facility.
Lee: Okay.
Jason: So, the material dumps in.
This auger conveyor at the bottom is controlled by a frequency drive.
Lee: Okay.
Jason: It goes up that bucket elevator to a SWECO.
That SWECO pulls out all the big foreign objects as well as sand.
Quickly then goes from that SWECO up this bucket elevator to the debearder.
That debearder chews the product up, makes it more consistent for us.
Lee: Okay.
Jason: From there, it goes through the cleaner.
The cleaner scalps and sifts other foreign materials.
From there... Lee: Clean it up.
Jason: ...we go into the other building.
Lee: Alright, let's go.
Let's check that out.
Jason: Alright.
Let's roll that way.
Lee: What do we got here, Jason?
Jason: Lee, right here we got two examples of screens that go inside this cleaner.
Lee: Okay.
Jason: We have here a scalp screen.
Lee: Scalp screen, okay.
Jason: So that's gonna scalp off the bad material.
Lee: Yep.
Jason: And this we have a sift screen right here.
Lee: A sift point, okay.
Jason: So the smaller, lighter material is going to go through this screen.
Lee: Okay.
Jason: And it's either going to go to salvage or to garbage.
So we've got different cuts along this machine.
We can do a lot of different things.
We come over here to the end.
We've got about 10% less bark than we did outside.
We're getting a little bit closer, a little bit refined.
Lee: Yeah.
Jason: And then we get to our density machine.
Lee: Okay.
Jason: We have a gravity table right here.
Lee: Nice.
Look at that.
Wow.
That's beautiful.
Jason: So we've got your heavies over here.
Lee: Okay.
Jason: And we've got your lights over here.
Lee: Nice.
Jason: In between that is our seed that we're going to keep.
Lee: So it's almost like panning for gold back in the day.
Jason: It's very similar.
Lee: Okay.
Jason: And then we come into our mixer.
This just takes and homogenizes the seed, takes what we've done over the last, you know, 10, 15 minutes compiles it, keeps it together.
And then from there we're gonna bag it off with this nice bulk bagger here.
And then it's ready and waiting for test.
Lee: Okay.
Jason: We're gonna go over to the other side and package it off.
Probably about 20 to 30 days.
Lee: Nice.
Jason: Over here, we have the bagging process.
Lee: Okay.
Jason: So unlike over there, taking 10 to 15 minutes to get to the end of the line.
yeah, this takes just a few minutes.
It can do about 400 bags an hour.
Then the seed comes down the conveyor and before the robot takes and picks it off the end, it will drop that seed, reposition the seed one more time, come back to the end.
Lee: Very nice.
Look at that.
Okay.
Jason: And then after this, we put some stretch wrap on it and it gets shipped out.
Lee: That's unbelievable.
That works out really nice.
Hey, I want to thank you so much.
I appreciate it.
Jason: Thank you.
Lee: It was good.
It was nice meeting you.
Jason: Very nice meeting you.
Michael: Jason, thanks for giving us the opportunity to learn about your seed-cleaning plant.
Jason: Thank you so much.
Michael: Just absolutely wonderful.
Lee: Michael, it's been a pleasure working with you.
Michael: I enjoyed it immensely.
Jason: You guys have a great day.
Michael: We will.
Lee: Thank you, sir.
See you soon.
Michael: Take care.
Lee: Alright.
Bye now.
Jason: Alrighty.
♪♪ Kevin: There you are, Mark.
Mark: Hey, Kevin.
Kevin: I hear we're talking hardscaping, huh?
Mark: So that's what we have in front of us, for sure.
Kevin: Alright.
Mark: So what you're looking at is traditional brick, okay, and traditional patterns.
Kevin: Okay.
Mark: This is a molded brick, which is very, very typical back in the day.
Kevin: So literally it is put in a mold, fired, baked, dried, all that stuff.
Mark: All that stuff.
But this is what we call a running-bond pattern.
So you can see it going back and forth.
It does over here as well, but this goes the long way and not the short way.
Kevin: Wait, wait.
So let me just make sure I got that straight.
Mark: Sure.
Kevin: If we've got a walkway with a left and a right side, you're telling me this goes back and forth this way... Mark: Yes.
Kevin: ...whereas our left and right side is here.
So these run the length.
Mark: Exactly.
And by the way, this is my favorite because usually walkways are long.
And this gives me that linear feeling.
Kevin: Right.
Mark: Yep.
This is the same pattern, running-bond pattern, but set at a diagonal, usually used for patios.
Over here, if you want to spend a couple bucks, we have a herringbone pattern.
Kevin: And is this a couple bucks more because a complicated layout, or because you end up with a lot of cut brick and waste or both?
Mark: So you do have the most cuts out of a herringbone pattern.
But if you do set everything correctly and make it straight and take your measurements off the center, you're going to have less cuts.
Kevin: Nice.
Mark: Alright?
Kevin: Alright.
Mark: Over to my right is what we call a basket-weave pattern.
Very, very simple.
No cuts at all with this one.
And you can see the simplicity -- two by two by two by two.
Kevin: Okay.
So these are patterns.
Mark: Yep.
Kevin: We can choose different materials.
Mark: Right.
Kevin: And you help me out here.
Mark: Sure.
Kevin: This looks like a traditional brick.
Mark: Yes.
Kevin: And this does not.
Mark: Okay.
So, this is a traditional brick.
It's actually everything you see on your feet in Boston.
That's why they call this a city-hall paver.
It's not a brand name, but it's a nickname.
Kevin: Yeah.
Mark: This is more of what they consider a paver.
This, you can see, is a little shorter, and it's not as wide as this.
Kevin: Also bigger.
By design?
Mark: Yes.
So that is by design.
A true brick paver is four inches by eight inches.
Kevin: And then here, the other thing that I'm seeing with the pavers at least is colors?
Mark: Right.
So this is what we call a color range.
You can see that the reds are mixed in with the browns.
Kevin: Did you buy a palette of all this color and all this color, mix them, or does a palette come mixed?
Mark: Comes mixed.
Kevin: It does?
Mark: Yep.
Kevin: Oh, nice.
The other thing that I'm noticing is texture.
Right?
Mark: Right.
Kevin: Which is pretty distinctive right there.
Mark: Exactly.
So this is what we call a matte finish.
And all that means is you get a good grip on your foot.
Kevin: Mm-hmm.
Alright.
When you said pavers, I get it with brick.
Mark: Right.
Kevin: The size, the sharp edges.
But I also was thinking when I heard pavers, I often think of, like, concrete.
Mark: So that's a whole new thing.
And that's right over there.
Kevin: Let's check that out.
Mark: Alright.
Kevin: Alright.
There they are.
Mark: Alright.
Kevin: That's what I'm thinking with pavers.
Mark: Exactly.
Kevin: Concrete.
Right?
Mark: Yes.
So this is the modern paver.
You can see the variation not only in size, shape, but color.
Kevin: Color as well.
And so I presume, since it's concrete, we're talking the color comes from dye.
Mark: Yep.
Kevin: So you got the lights.
You got the reds.
You got the darks.
Love that.
Paver -- So we got the crisp edges.
Mark: Correct.
Kevin: But also the nubs along the side.
Mark: Right.
So, one of my favorite characteristics of these pavers is that nub.
We're going to bring the pavers together until the nubs hit.
And that's going to allow a nice gap for the polymetric sand to sink down and hit the bottom.
Kevin: Nice feature.
So that speeds up your installation, I presume.
Mark: Sure does.
Yeah.
Kevin: That's really good.
Okay.
And so different sizes.
Price-wise, these are the least expensive options?
Mark: Least expensive option.
Once you start a pattern, you pick a pattern and you go with that pattern.
It's just rinse and repeat after that.
So once you get going, you're on a roll.
The material is a lot cheaper.
Kevin: Yeah.
So any downsides?
Mark: The downside to me is always the color fade.
Kevin: Oh, really?
Mark: So after a few years -- You can see how bright this one is right now.
But after a few years, that's going to fade.
Kevin: So two years from now you're not going to be looking at that red?
Mark: Right.
Kevin: Oh, that's a bummer.
Mark: Very dull.
Kevin: Alright.
And in the winter if I've got ice, what happens if I throw salt on these things?
Mark: So as soon as you throw salt down on these, they're going to start to degradate.
Kevin: So if I, in the winter, am putting this stuff down to keep the ice off, I'm going to end up damaging this stuff?
Mark: Exactly.
So during installation, make sure you have a good pitch on both sides.
Kevin: So that everything runs off.
Mark: So everything runs off.
Kevin: Okay.
Good.
Mark: Alright?
Kevin: Concrete pavers.
Ooh, ooh.
Mark: Yes.
Kevin: Now we're into naturals.
Mark: Here we come with some of the fancy stuff.
Kevin: So this is a paver, right?
Mark: So, patios, walkways all can be done with different materials.
This happens to be bluestone.
They come in different sizes so you can use different patterns.
Kevin: Right.
Natural material, so this is coming out of a quarry?
Mark: That's right.
So it's quarried, comes out in a block.
They shave the block down and they'll give you these different sizes that you see.
Kevin: So you get a nice smooth cut on the sides.
You get the thickness that you want.
Mark: Correct.
Kevin: But on the face, you get that sort of beautiful, irregular, natural look.
Mark: That's right.
And skid-resistant as well.
Kevin: And I presume more expensive than concrete because that's the most affordable.
Mark: That's right.
So if you want to spend some money you're going to get the bluestone or that granite.
Kevin: So this is nice too.
Mark: Right.
Kevin: Wow.
Look at that.
Again, natural material.
Mark: Yep.
So this is actually quarried locally.
It's what we call a Chelmsford granite.
That's a salt and pepper right there.
So, and you can see nice skid-resistant surface as well.
Kevin: And is this sort of as durable in your mind as the bluestone?
Mark: Exactly, if not more so.
Kevin: Yeah.
Price-wise, compare?
Mark: Uh, they're comparable.
But you'll probably spend another buck for that.
Kevin: Oh, okay.
Great.
Nice.
So, if I'm thinking of doing a patio myself and I need to order this, what do I tell them?
Like, how am I telling quantity?
Because that I kind of get.
Everything's the same, but with different sizes, like... Mark: Right.
So square footage is what you give them, which is width and length.
Kevin: I got 10 by 15.
That's 150 square feet.
Mark: Yep.
Kevin: Is that what I tell them?
Mark: That's what you tell them.
I actually add 2% on top of that for waste.
If I find a piece that has a little bit more of a cleft than I like, I'll throw it out, get another piece.
So that's why I go 2%.
Kevin: And if I say 150 square feet, are they going to figure out how many bigs, how many littles so that it adds up to that?
Mark: They do.
It's well thought-out.
And again, it's a pattern, but you won't pick the pattern up when you put -- when you put it down.
So square foot has already have that figured in.
Kevin: Alright.
Well, I'm going to add 10% given the way I work.
Mark: Well, you do you.
Kevin: Okay.
Alright, Mark.
Thank you.
Paving 101.
Mark: You got it, Kevin.
Kevin: Appreciate it.
♪♪ Emily: Good morning.
Thanks for coming out.
How are you?
Nathan: Good.
Nice to meet you.
Emily: Nice to meet you.
Nathan: Who is this guy?
Emily: This is my son Freddy.
Nathan: Freddy, nice to meet ya.
Do a spin.
Emily: Whoo!
Nathan: Go to Mama.
Emily: Thank you.
Nathan: The house is beautiful.
Emily: Thank you so much.
We just completed a big renovation.
The inside's basically done, but we're still finishing up some things out here.
Nathan: Very nice.
You wrote me about a porch swing, though.
Emily: I did.
It's right up here.
I can show you.
Nathan: Take a look.
Freddy, can you lead the way?
Emily: Here we go.
Up the stairs.
This is where we have the porch swing.
Nathan: This is a great spot for one.
Emily: Thanks.
Nathan: I like this.
So, two things I'm thinking about when I think of a porch swing is the clearance around it... Emily: Right.
Nathan: ...and then I think about the structure that we're going to attach to.
Emily: Okay.
Nathan: Starting with the clearance, we're looking for maybe two to three feet behind it so it has plenty of room to swing.
Emily: Okay.
Nathan: Left to right, you look really good, plenty of clearance.
Structure -- What do you think you have for structure up in the ceiling?
Emily: So, when we did the renovation, we did ask the contractor to put an extra support joist in the ceiling.
I can show you a picture that we have saved of it.
It's about two feet out from that end.
Nathan: Two feet from this end out here?
Emily: Right.
Nathan: Alright.
Emily: Right.
But now that we have this swing, which we really like, we're realizing the chain is actually in the middle of the swing, so two feet might not be enough space.
Nathan: Okay.
They like to see about two to three feet behind a porch swing.
So let's move it out a little bit more.
Emily: Freddy, grab it.
Okay?
Nathan: Give a push.
Oh!
Emily: Thank you.
Nathan: Good job.
Actually, I'm gonna come on your side, alright?
Let's check our measurements.
I got about 32 inches to the center point roughly right now.
Emily: Okay.
Nathan: Freddy, can you give me a hand?
Look up.
See the ceiling?
Freddy: Yeah.
Nathan: I think that we're gonna have to open up the ceiling.
We're gonna have to check out where the ceiling joists are.
We might have to add a new ceiling joist.
Close things back up.
Add some brackets so we can hang the swing up.
Do you want to give me a hand?
Freddy: Yeah.
Nathan: Alright, let's get to work, okay?
Alright, let's do it.
So we know we're coming out this side.
So we know you're set up probably around two feet.
Emily: Right.
Nathan: We're going to be coming out to that 32-inch, 3-foot range.
So I have some Cortex, I have some screws and bungs right here at 44.
So I'm going to go right here at 43.
And then we can make that cut.
The way that I want to get started is by pulling down this piece of PVC fascia board that you have here.
Emily: Okay.
Nathan: It's a really long run.
So I want to do a relief cut.
To make that cut, I'm going to use an oscillating tool.
And I took a 2x4 and I ripped a 22 1/2-degree angle on it.
I'm going to guide my oscillating tool along it.
So I make a really clean cut.
So when we put it back, it looks nice.
Emily: Great.
Nathan: Alright.
So, there's my mark.
Keep it nice and square.
[ Drill whirring ] [ Whirring ] So now we need to pull that board down.
Emily: Okay.
Nathan: So what we need to do is work essentially backwards of what they did.
So you can see here you have a bung.
And behind that there's a screw.
So if I take a new screw, drive it in, I hit the top of the old screw and then I can pull that out.
Then I take it and I put it in reverse.
So now we can just do that to all the screws, and these will fall right down.
Emily: Perfect.
Nathan: Hey, I like your glasses.
Freddy: Thank you.
Emily: You guys match.
Look, you both have glasses and a hat.
Nathan: [ Gasps ] What's this?
Emily: Look, you both have a drill.
[ Drill whirring ] Nathan: Buzz yours.
[ Drills whirring ] [ Laughs ] Zz-zzz-zzz.
[ Drill whirring ] Alright.
That should be the last one.
Freddy: Hey, I have your... Nathan: Hey, can you grab this drill for me?
Freddy: Yeah.
Nathan: You're doing a good job.
Big muscles.
Oh, I'll take that one.
Thank you.
Emily: Okay.
Nathan: Alright, I got it.
So now we can see what we're working with.
So we got our beadboard.
We can get to this -- to the back, to the side.
What we need to do is start pulling these out to expose the ceiling.
But we want to do it really, really cautiously because we don't want to break it.
Emily: So we're trying to loosen the nail?
Nathan: Yep, yep.
So pry that down and then go to the next one.
Good.
Alrighty.
Now that we've got everything cleaned off, we can call out what we're working with.
So we have our beadboard ceiling we just took down.
That was attached to our strapping that is running on the bottom side of our ceiling joists.
And then right here, there's that beam that they put in, that ceiling joist.
Really nice one, 4x6.
Above that we have our rafters coming down.
The rafters and our ceiling joists are landing on top of our beam out there.
And then if we swing over here, they're tying in your -- your ceiling joist is tying into your ledger.
So what we need to do, build a new ceiling joist, put it just where we want it and then we can close things back up.
Emily: And that's where the swing will go.
Nathan: That's where the swing will go.
Emily: Great.
Nathan: We're going to cut this strapping out so we can get our new ceiling joist in.
Emily: Okay.
♪♪ Alright.
Here we go.
So I got my 2x8s screwed together.
Emily: I'll guide it over the X's to center it.
Nathan: Perfect.
♪♪ Alright.
So now I'm going to add some blocking to either side of this ceiling joist over here.
♪♪ I'm going to add a hanger below the ceiling joist over there.
And then we can put our strapping back in.
And then we can close things up.
Emily: Great.
Sounds good.
Nathan: I got these special 2 1/2-inch structural screws for the hanger.
♪♪ And now we can toss in some strapping.
And we're just going to sister it on right next to the existing strapping.
Emily: Okay.
Nathan: Send her home.
Emily: Alright.
Nathan: One last step we need to do is fill in some strapping going in line with our ceiling joist because we have our swing hanger.
It's going to mount approximately right here.
Alright.
Now we're ready to do our layout for our swing hangers.
These are the ones I picked up.
Nice black finish.
They are rated to hold 2,000 pounds, so nice and strong.
What I want to do is actually a layout while we have everything open.
Then we're going to close it up and then we're going to mount them.
Emily: Okay.
Nathan: So to do that, I took some measurements off of the swing that you provided.
Right?
It's very specific, but from chain to chain, you have 46 1/2 inches.
Emily: Yep.
Nathan: I take that measurement.
I divide that in half -- 23 1/4.
Now, when you hang the porch swing, you want it to -- the chains to pitch out a little bit.
So we'll have an inch and a half on either side of pitch, and then simply three inches from our first lag hole to our second lag hole.
We'll bolt it up after the beadboard ceiling's up and it'll be good to go.
Emily: Sounds great.
Nathan: Alright.
So for the layout 23 1/2 inches off our center point is right there.
And then you are going to go 23 1/4 your way.
And that is going to put me to my first lag bolt.
Emily: Okay.
Nathan: And then I'm going to introduce the three-point laser.
I'm going to take these pinpoints and drop them down onto the surface of your deck.
Alright.
So that's one mark.
Freddy: Mark?
What's a mark?
Nathan: A mark?
Emily: Like a pencil mark.
Nathan: Alright, then I know I got to go over like three inches.
Freddy: Whoa.
Nathan: I think that's pretty good right there.
See this mark here and here.
So right above them, those marks transferred down.
And the reason I'm going to do that is we can close everything up.
I can set my laser up after and project those back up, pre-drill for our lag bolts.
Everything will be really clean, and we'll know exactly where we're going.
♪♪ Perfect.
Absolutely perfect.
♪♪ ♪♪ ♪♪ Drop that in there.
Is it going?
Okay.
Remember, we got to get that on that hook down below.
Freddy: Yes.
Nathan: Alright.
Alright.
And then we'll get Mama.
Mama will help me hang it up.
♪♪ Tell me what you think.
Emily: Perfect.
This swing is awesome, right?
Nathan: You like it?
Freddy: I'm gonna sit right...here.
Nathan: You gonna sit after a hard day's work?
Emily: Very hard day's work.
Thanks for letting him help.
Nathan: You're welcome.
Thanks for all your help today, Freddy.
It's a little bit of homework for you, though, alright?
Maybe once a year, check the nuts and bolts.
Make sure everything stays tight.
Emily: Okay.
Nathan: Nice and safe.
Other than that, you're good to go.
Emily: Great.
Thanks so much.
Nathan: Enjoy it.
Freddy, thank you for all your help today.
I'll see you soon?
Freddy: Yeah.
Nathan: Alright.
Take care.
Emily: Bye.
Thank you.
Freddy: Bye.
Thank you.
Nathan: You're welcome.
♪♪ Emily: Good job.
Freddy: Good job.
♪♪ Kevin: Next time on "Ask This Old House," Richard talks about sink-drain maintenance with tips and tricks to keep everything flowing.
Then Mauro demonstrates both some low-tech and high-tech ways to test for lead paint, and a steep hill has a homeowner stumbling.
Mark steps in to help installing some hillside stairs.
Mark: I don't think that could have gone any better.
Kevin: All that on "Ask This Old House."


- Home and How To

Hit the road in a classic car for a tour through Great Britain with two antiques experts.


Support for PBS provided by:
Funding for Ask This Old House is provided by The Home Depot, Renewal By Andersen, and ChipDrop.